How to Knit a Baby Cardigan Step by Step
Also available in:  Español
- Materials to make a Knitted Baby Cardigan size 1-3 months
- Gauge
- Step by step on how to make a Knitted Baby Cardigan
Today I want to show you a different way of making a Knitted Baby Cardigan. As many of you know, we have made cardigans starting from the neck, starting from the bottom and seaming different pieces together, but the interesting thing about today's tutorial is that the knitted garment is not going to be shaped the usual way of making horizontal lines but instead vertical. On this occasion, we are going to learn to make a Knitted Baby Cardigan using a pattern that starts by knitting a sleeve and ending with the other one.
In this case, not only will it have this twist, but also, we will be using the wrong side of the stockinette stitch. A very unusual option but that leaves a very pretty and original result.
Materials to make a Knitted Baby Cardigan size 1-3 months
- 1 skein of Katia Merino Classic en el color 26. 100g = 240m. DK/Light weight.
- A pair of 4 mm straight knitting needles
- 1 wood button
- A tapestry needle
Gauge
20 stitches x 30 rows in Stockinette Stitch (after blocking)
Step by step on how to make a Knitted Baby Cardigan
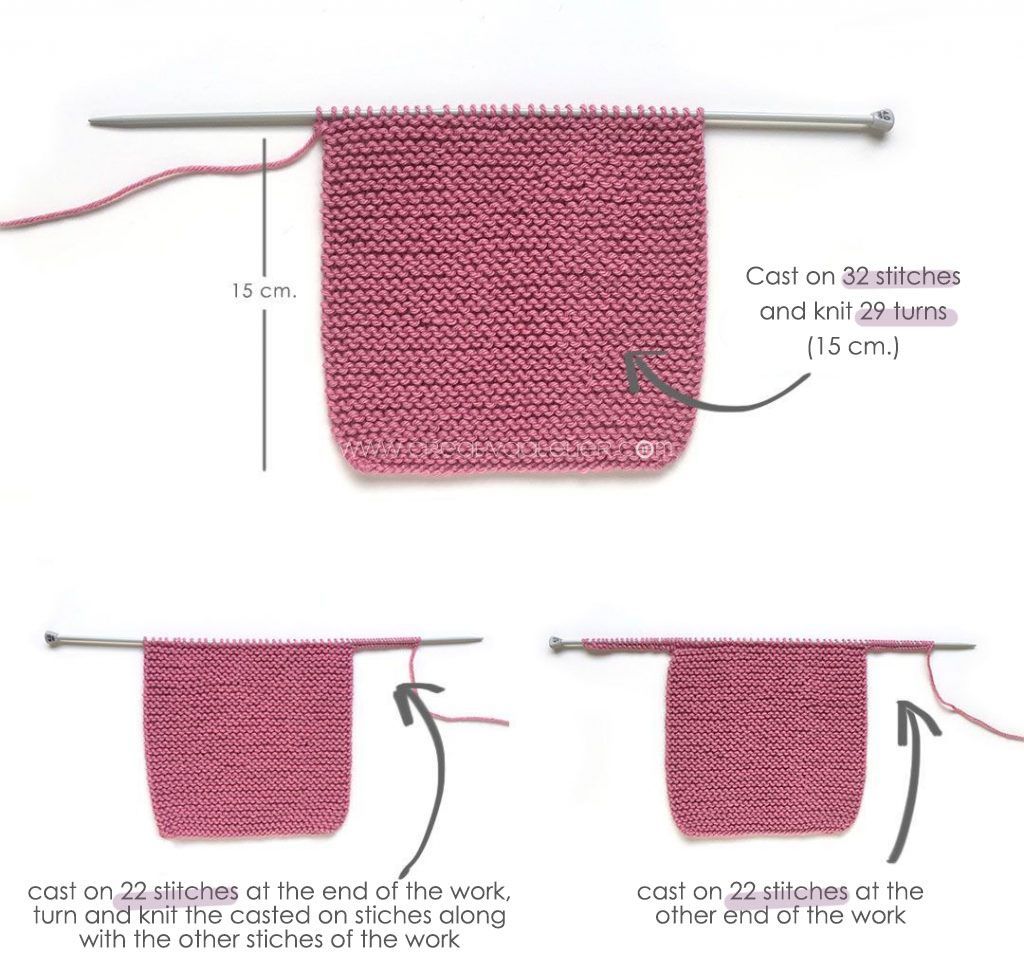
To make our Garter Stitch Cardigan, we will start by knitting one of the sleeves. We must cast on 32 stitches and knit 29 turns (remember that each turn equals two rows) until we have 15 cm. of fabric.
Once we have this 15 cm., which is the length of the sleeve from the armhole, we cast on 22 stitches at the end of the work and knit one row. Afterwards, we cast on another 22 stitches on the other end, this way, we will be making the front part and the back of the handmade cardigan.
Once we have the 22 stitches on each side, we will knit the first 22 stitches in stockinette stitch, the middle 32 stitches in garter stitch and the remaining 22 stitches in stockinette stitch. We will continue knitting in this manner until the fabric measures 11 cm.
This is the time where we need to begin to open the work for the neck opening…

You need to knit 38 stitches, bind off 6 stitches and continue knitting the row as you have been doing before. Remember that no matter what you do, the first 22 stitches are knitted in stockinette stitch and from then on in garter stitch until the remaining 22 stitches, which are knitted in stockinette stitch.

From this point on, we will only work with the 32 stitches of the front. Do not worry about the other stitches on the needle, they can remain in the needle while you knit, they will not bother you.
This way, we will knit these 32 stitches for 8 turns (16 rows). It is easy not to lose count of the knitted turns in garter stitch; each little bump made after each turn counts as a turn, this way, if you do not want to count each turn while you knit, you can count after a few turns just make sure you have "8 bumps".
Once you achieve the desired length, we bind off the 32 stitches and cut off the yarn.

Knit 38 stitches for 12 turns (24 rows) and cast on 6 stitches at the end of the work. Cut off the yarn leaving a 20-25 cm tail.

Although this cardigan is easy to knit, maybe this is the moment in which you must pay close attention for everything to come out right.
We will have to make a small piece that will form the other front part where the buttonhole will be located, for this, in the needle that we have available we will cast on 32 stitches and knit two rows in garter stitch. In the next row, we will knit 3 stitches, knit two together, bring the yarn to the front and finish knitting the row as established.
Afterwards, we must knit 8 turns knitting the first 10 stitches in garter stitch and the following 22 stitches in stockinette stitch. Once done the finished piece should look like the one in the photo. It is very important that the yarn tail ends where it is shown in the picture, in other words, it ends in the garter stitch region.

At this point, we should have two knitted pieces, the small one that we just finished with the yarn in the garter stitch region and the other large one with the yarn ending in the same stitch.
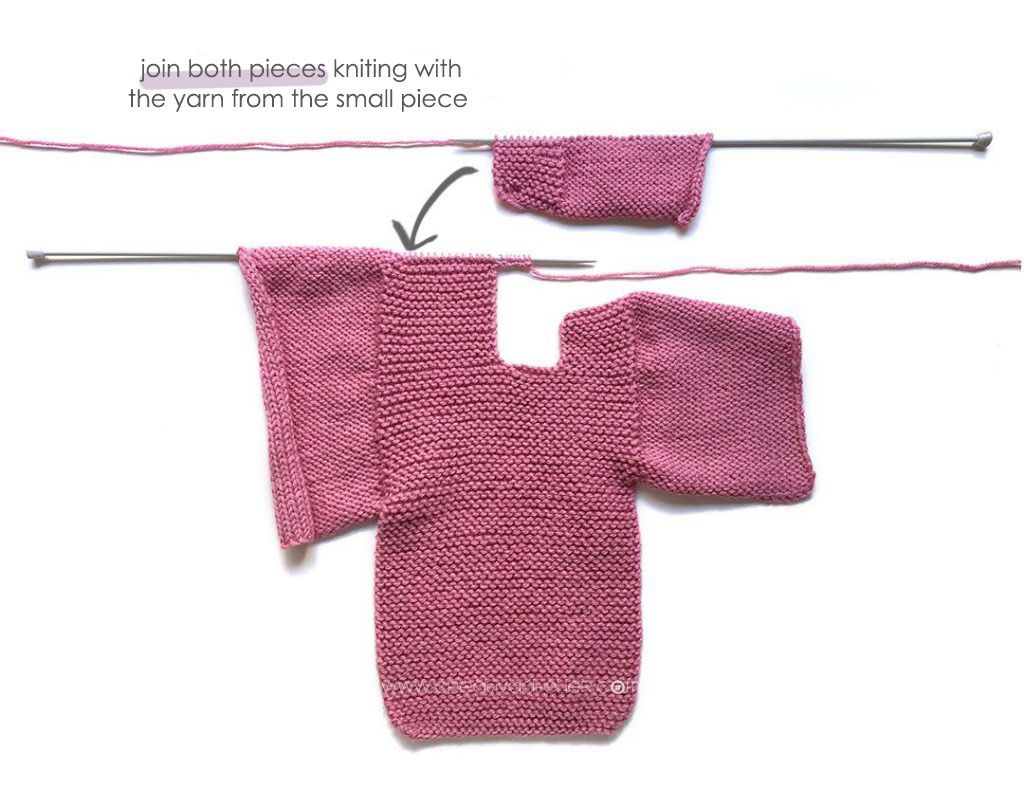
Now we are going to join both pieces. If everything is correct, we must knit with the yarn from the small piece, this way we can continue knitting in garter stitch the first 6 stitches we casted on at end of the work of the large piece, the 16 stitches in garter stitch and then the 22 stitches in stockinette stitch.
Now we have joined both pieces! All we must do now is to continue in the established pattern of alternating between garter and stockinette stitch within a row for 13 turns. After we must bind off 22 stitches, knit the middle 32 stitches and bind off the remaining 22 stitches.

29 turns of the other sleeve and bind off all the stitches.

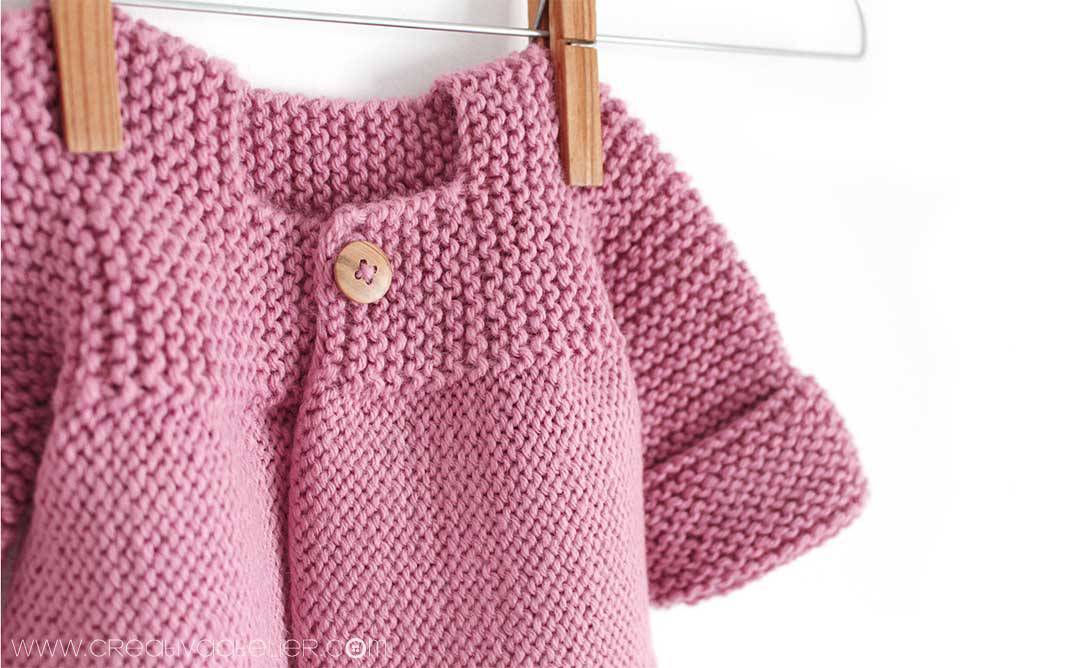
Finally, with a tapestry needle, we must seam the sleeves together and the sides of the body and sew on the button.
Although this is something that is not typically done when knitting, I have opted to do a kind of hem at the bottom because I like the result and it prevents the fabric from rolling up.


As you can see, it is a different and simple way of making a Knitted Baby Cardigan starting from the sleeve instead of the neck or from the bottom, as we are used to doing.
I love the combination of garter stitch with the reverse side of stockinette stitch, it is something that we are not used to doing often because we usually save this side for the wrong side of the work, but in this case, it gives the finished work a different touch.
What do you think of combining this Knitted Baby Cardigan with a matching pixie hat and booties?
To make these adorable knitted booties, all you must do is follow this tutorial I published a couple of months ago, the only variation is done in the first step, when knitting the ankle region, instead of knitting 16 rows (8 turns) me must knit 26 rows (13 turns). The rest is knitted as shown in the tutorial. Finally, this time, instead of adding a button as decoration, I added two yarn tassels to match the pixie hat.
If you want to learn how to make a pixie hat you can find the pattern and step-by-step tutorial in this link, so you do not stay without this winter matching set!


Whether you are an expectant mother or want to make a special handmade gift to a newborn, this Knitted Baby Cardigan is a perfect and complete option for the cooler months.
Kisses!
How to Knit a Baby Cardigan Step by Step
Source: https://www.creativaatelier.com/knitted-baby-cardigan-two-needle/?lang=en
0 Response to "How to Knit a Baby Cardigan Step by Step"
Postar um comentário